Sending emails is like throwing darts blindfolded – you hope your message hits the bullseye but have no idea if recipients will even see it.
Wouldn’t it be nice if you could peek out from under that blindfold and schedule your email darts to fly when your intended recipients are actually sitting in the office?
Well, it turns out you can! Outlook’s email scheduling feature lets you time your email launches down to the precise minute.
Whether you want your messages to land at the peak of someone’s inbox, or sync up emails across multiple timezones, Outlook’s scheduling capability has your back. No more email darts randomly flung and forgotten into the void.
In this comprehensive guide, we’ll explore how to master Outlook’s delay delivery and schedule send features across desktop, web and mobile.
You’ll learn how to conveniently time and plan your most important communications for when recipients are ready and waiting. Let’s send those email darts flying on target!
Overview of Scheduling Emails in Outlook
Sending emails is a core part of our work and personal communication. But sometimes you don’t want an email to be sent immediately. You may want to schedule it for a later date or more appropriate timing. This is where Outlook’s handy email scheduling feature comes in.
With Outlook’s scheduling capability, you can set emails to be sent whenever you choose – whether it’s later in the day, middle of the night or several weeks from now. Just imagine the flexibility and convenience!
No more worrying about remembering to send that important reminder email to your team. Or struggling to stay up late to have emails go out in the morning. Outlook lets you schedule all that in advance with just a few clicks.
Benefits of Scheduling Emails in Outlook
Here are some of the major benefits of using Outlook’s email scheduling feature:
- Send emails when recipients are active: Scheduling allows you to time your emails so they arrive when recipients are most likely to read them, like early morning or during work hours. No more emails getting buried!
- Queue emails in advance: Get your emails ready now and have Outlook send them later. Prepare responses ahead of time and space out newsletters/promotions.
- Communicate across timezones: Schedule emails to account for different timezones of recipients worldwide.
- Avoid looking spammy: Spacing out bulk emails over time avoids spam filters that may flag blast emails sent all at once.
- Set reminders: Use scheduled emails like reminders to yourself and others. Never miss a meeting prep again!
Outlook Platforms that Support Email Scheduling
The good news is Outlook’s email scheduling feature is available across most platforms:
- Outlook desktop app – Scheduling works on both Outlook for Windows and Outlook for Mac. The steps are slightly different but achieve the same result.
- Outlook web app – The Outlook web interface also lets you schedule emails seamlessly. This works on Outlook.com, Office 365, and more.
- Outlook mobile – Scheduling emails natively isn’t supported yet on iOS/Android Outlook apps. But you can use the Outlook mobile web app to schedule.
So whether you use Outlook on a desktop, web, phone or tablet, you can enjoy the scheduling capability (with some minor limitations on mobile).
How to Schedule an Email in Outlook – Quick Steps
While the scheduling process differs somewhat across Outlook versions, the general gist is pretty straightforward:
- Compose your email as normal with recipient(s) and content.
- Access the scheduling/delay delivery options.
- Choose the date and time to send the email.
- Hit send! The email will now queue up and automatically be sent at the scheduled time.
- You can find and manage scheduled emails to edit, cancel or reschedule.
And that’s scheduling emails in a nutshell. The specific steps for Outlook desktop, web and mobile are covered later in this guide.
Use Scheduling Judiciously!
As awesome as Outlook’s scheduling feature is, a word of caution that it should be used judiciously.
For example, scheduling a hundred emails to blast out at 8 AM on a Monday could easily trigger spam filters. Spacing them out sensibly is better.
Similarly, don’t overdo scheduling for simple one-off emails unless needed. Use it where it really provides value – like timing newsletters, reminders, follow-ups etc.
With some prudence, email scheduling can take your Outlook productivity to the next level!
Now that you have an overview of Outlook’s scheduling capability, let’s get into the specifics…

Why Schedule Emails in Outlook?
Now that you know Outlook allows scheduling emails, you may be wondering – why exactly would I want to schedule emails? Can’t I just hit send and be done with it?
While that works for many day-to-day emails, scheduling emails provides some unique benefits that can really enhance your communication and productivity.
Let’s explore some of the top reasons you should use Outlook’s scheduling capability.
Send Emails When Recipients are Most Likely to Read Them
A major benefit of scheduling emails is it allows you to time your emails for when recipients are most likely to read them.
For example, scheduling an email to send at 9 AM means the recipient will likely see it towards the start of their work day when they’re checking emails. Much higher chance of it being read than if sent at 9 PM!
Similarly, sending emails on Monday morning increases visibility compared to Friday evening when people are checked out.
Optimal Send Times for Scheduling Emails
Here are some optimal send times to consider when scheduling emails:
- Early morning like 8-9 AM on weekdays
- Mid-morning like 10-11 AM (after people have settled in)
- Post-lunch window like 1-2 PM
- Late afternoon before wrap up like 4-5 PM
Of course, the best timing depends on your recipients’ habits. But early/mid-morning and mid-afternoon tend to be peak email checking times for most professionals.
Getting your emails in the inbox at these sweet spot times guarantees higher open rates.
Time Emails for Recipients in Different Timezones
Another key benefit of scheduling emails is it allows you to optimize timing for recipients in different timezones.
For example, if you have customers in timezones across the US, UK and Australia, you can schedule morning sends for each region instead of just blasting emails out.
This ensures your recipients get the emails when starting their work day versus odd hours.
With Outlook’s scheduling, coordinating cross-timezone communications becomes much easier.
Schedule Bulk Emails in Advance
Do you need to send announcments, newsletters, promotions or other bulk emails periodically?
Scheduling them in advance using Outlook is a huge time saver.
For instance, you can batch create all your emails for the week on Monday itself and schedule sends at 9 AM on each subsequent day.
This allows you to manage essential communications without daily effort.
Avoid Sending Mass Emails All at Once
While scheduling bulk emails in advance is great, sending them all at the exact same time can backfire and cause deliverability issues.
If you schedule 100 emails to all go out at 8 AM Monday, many email providers will see that volume at once as spam behavior.
The solution? Space out your scheduled bulk emails over a period of time to make the volume appear more natural.
For example, schedule 20 emails each at 8 AM, 10 AM, 12 PM, 2 PM and 4 PM on Monday.
This steady cadence avoids spikes in volume that look like spam. Getting your emails smoothly delivered is the whole point after all!
Set Email Reminders to Yourself and Others
Here’s a simple but powerful idea – use scheduled emails almost like reminders and alerts!
For example, if you need to remember to submit your quarterly reports by the 25th each month, schedule an email to yourself as a reminder for 24th.
Similarly, schedule emails to colleagues reminding them to send progress updates, wish someone happy birthday, or follow up on an important project.
Scheduling lets you preset essential communications instead of constantly needing to remember.
Top Email Reminders to Schedule
Some top reminders and alerts to schedule for yourself and others include:
- Project progress check-ins
- Deadline reminders
- Meeting/call preps
- Birthdays and events
- Report and goal tracking
- Payment and renewals
The options are unlimited!
Schedule Follow-Ups to Recipients
Here’s an awesome productivity hack – when emailing someone like a prospect or client, also schedule a follow up email to automatically go out in a week if they haven’t replied.
This gentle nudge and continued touchpoint increases chances of eventually connecting.
Outlook’s scheduling takes the effort out of managing follow-ups manually. You can space them out over days or weeks depending on the situation.
Following up with scheduled reminders also shows recipients that you value communicating with them.
Schedule Emails in Advance Before Vacation
Finally, scheduling emails in Outlook is invaluable when you plan to be away and still need communications to continue.
For instance, before a vacation, you can batch schedule emails to go out on each day as needed.
This keeps your correspondence flowing even when you’re on the beach sipping margaritas!
Similarly, schedule automated “out of office” replies to let senders know you’re away before you leave.
So in summary, Outlook’s scheduling offers a ton of productivity benefits. Use it where it makes sense rather than for every single email. A little planning and strategy goes a long way!
How to Schedule an Email in Outlook Desktop (Windows & Mac)
The Outlook desktop application makes scheduling emails super simple. The process is mostly the same on both Windows and Mac, with just some minor interface differences.
Let’s go through the step-by-step instructions to schedule emails in Outlook desktop.
Scheduling Emails in Outlook for Windows
Scheduling an email in Outlook for Windows takes just a few clicks thanks to the Delay Delivery option. Here are the steps:
1. Open New Email and Compose
Launch Outlook desktop on your Windows PC and create a new email as you normally would. Write out the full content – recipients, subject line, body text etc.
2. Go to Message > Options > Delay Delivery
Once your email content is ready, go to the Options tab in the ribbon menu. Click on the Delay Delivery button.
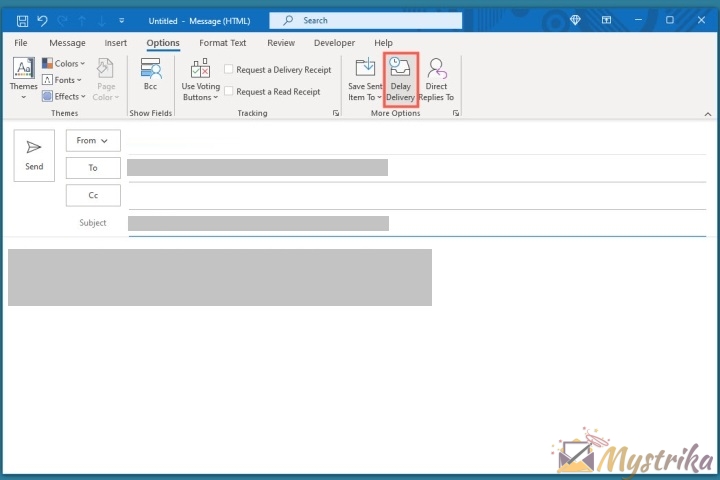
This opens the Properties popup window.
3. Check “Do not deliver before” and select date/time
In the Delivery options section, check the box next to “Do not deliver before”. This allows you to pick the date and time to schedule the email.
Select the date and time from the dropdown calendar and clock icons. You can choose a time in the future – days, weeks or even months later.
4. Close Properties and Click Send
Once you’ve chosen the scheduled date/time, close the Properties window by clicking OK or Cancel.
Back in the email, simply click the Send button as usual to schedule the email.
The email will now sit in your Outbox folder until the scheduled delivery time, when Outlook will automatically send it out.
5. Manage Scheduled Emails in Your Outbox
To view, edit or cancel scheduled emails, head to the Outbox folder in Outlook.
You can change the delivery date/time or uncheck the “Do not deliver before” box to send the email immediately.
And that’s it! Scheduling emails in Outlook for Windows takes less than a minute.
Scheduling Emails in Outlook for Mac
The process is very similar in Outlook for Mac, with a streamlined Send Later option:
1. Compose New Email as Usual
Launch Outlook on your Mac and create a new email. Write the content and add recipients.
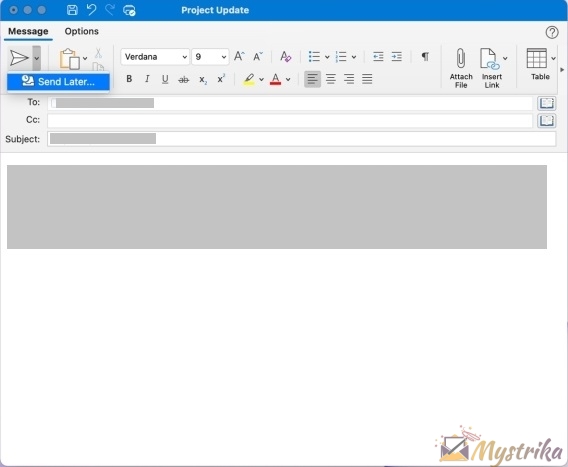
2. Click the Send Later Option
When your email is ready to schedule, click the drop-down arrow next to the Send button in the top toolbar.
Select Send Later from the menu.
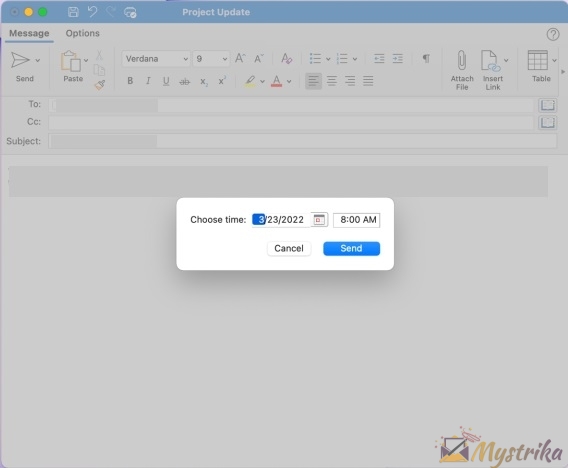
3. Choose the Date and Time
In the window that pops up, pick the date and time to schedule the email from the dropdown calendar and clock.
Click Send to schedule the delivery.
4. Manage Scheduled Emails in Drafts
You can access scheduled emails in the Drafts folder in Outlook for Mac.
Open scheduled emails from Drafts to edit, reschedule or cancel them before the send date/time.
And that covers the quick process for scheduling emails in Outlook for Mac.
Key Scheduling Tips for Outlook Desktop
Here are some tips to use Outlook’s scheduling capability effectively:
- Schedule emails early morning or mid-day for best results.
- Make sure Outlook is running at the scheduled time for email to be sent.
- Space out scheduling for bulk emails to avoid spam filters.
- Set reminders to yourself and others with scheduled emails.
- Follow up with recipients using scheduled emails if no reply.
- Always proofread scheduled emails before send time.
With just a bit of strategy, Outlook’s desktop email scheduling can become an invaluable productivity tool for your communication needs.
How to Schedule an Email in Outlook Web App
In addition to the desktop apps, scheduling emails is also seamless directly through Outlook on the web.
The web interface works for Outlook.com personal accounts, Office 365 business accounts, and more. The steps are very straightforward.
1. Compose Email as Usual
Open Outlook on the web and begin drafting a new email. Add your recipients, subject line, and email body content as you normally would.
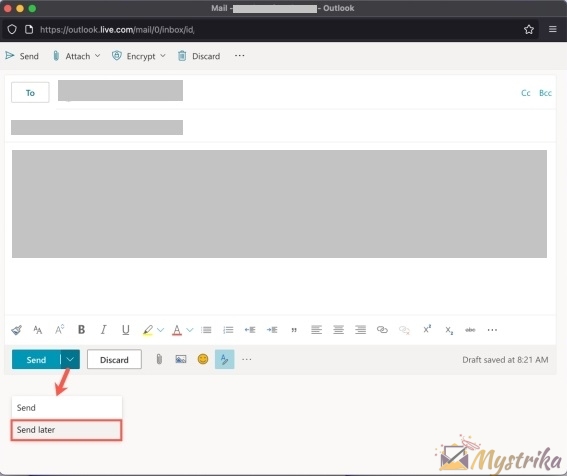
2. Click the Send Later Dropdown
Once your email is ready to be scheduled, click the dropdown arrow next to the Send button at the bottom of the email composer.
From the menu, select Send Later.
3. Choose the Date and Time
In the window that appears, pick the date and time you want the email to be sent.
You can select one of the suggested times or click on Custom time to choose any date/time in the future.
When done, click Send to schedule the email delivery.
4. Manage Scheduled Emails in Drafts
Scheduled emails will appear in your Drafts folder in Outlook on the web.
Open scheduled emails from Drafts to make any changes, reschedule or cancel them before the set delivery time.
And that’s all it takes to schedule an email from Outlook on the web!
Key Tips for Outlook Web Scheduling
Here are some tips to use the scheduling feature effectively in Outlook web:
- Schedule emails for early morning or mid-day for highest visibility.
- Outlook web will send scheduled emails even if you’re offline at delivery time.
- Space out scheduling for bulk emails to prevent spam filtering.
- Set reminders to yourself and others with scheduled emails.
- Follow up with non-responders using scheduled reminder emails.
- Always proofread scheduled emails before send time.
With just a few clicks, Outlook web makes scheduling emails a breeze so you can better plan communications.

Scheduling Emails in Outlook Mobile App
At the moment, Outlook’s mobile apps for iOS and Android do not have native support for scheduling emails.
However, there is a workaround using the Outlook web app’s desktop site on your mobile browser. Here’s how to schedule emails from Outlook mobile:
Outlook Mobile Doesn’t Support Scheduling
Currently, the Outlook mobile apps for both iOS and Android lack an option to natively schedule sending of emails.
The Send button immediately delivers the email. There is no Send Later or Delay Delivery capability yet.
Use Desktop Site of Outlook Web on Mobile
Since the mobile Outlook app doesn’t support scheduling, the workaround is to use the desktop site of Outlook on the Web through your mobile browser.
The desktop web app does provide the full scheduling functions.
On iOS or Android, open your preferred web browser like Chrome or Safari. Navigate to outlook.office.com/mail/inbox – the Outlook web app login page.
Once logged into your account, switch to the desktop site. For example, in Chrome tap the “Desktop site” option in settings.
Follow Regular Web App Scheduling Steps
Now with the Outlook web app’s desktop site open in your mobile browser, you can schedule emails the same as on a computer:
- Compose your email as normal
- Click the Send Later dropdown next to Send
- Pick your delivery date/time
- Hit Send to schedule
The email will be saved in your Drafts folder until the scheduled send time.
Accessing Desktop Site is a Bit Clunky
While this desktop site workaround lets you schedule emails from mobile, it’s a bit clunky and inconvenient.
The full desktop Outlook site doesn’t translate well to mobile screens. You’ll need to zoom and pan around.
Hopefully native scheduling capabilities come soon to Outlook mobile apps. But until then, the web desktop site gets the job done if you really need to schedule emails from your phone or tablet.
The native apps for Gmail and Apple Mail also allow scheduling, which is an alternative option outside of Outlook.
But when you need to schedule right from Outlook on mobile, use the desktop web app workaround.
Managing Scheduled Emails in Outlook
Once you’ve scheduled emails in Outlook, you’ll likely want to manage them – check status, edit content, adjust send time etc. Here’s how to manage your scheduled emails.
Find Scheduled Emails
To view, edit or cancel scheduled emails, you need to open them from:
- Outbox folder – For Outlook desktop app on Windows and Mac, scheduled emails are saved in Outbox.
- Drafts folder – For Outlook web app and Mac app, scheduled emails appear in Drafts.
Open the folder, locate your scheduled email and open it.
Make Changes or Cancel Scheduling
Once you open the scheduled email, you have a few options:
- Edit content – Make changes to the email content as needed – recipients, subject, body text etc.
- Adjust date/time – Use the scheduling window to push back or pull forward the delivery date/time.
- Cancel scheduling – For desktop app, uncheck the “Do not deliver before” box to send the email immediately. For web app, use the “Send now” link.
- Delete email – You can also delete a scheduled email to cancel sending it altogether.
Outlook Desktop vs Web/Mac Behavior
There is one key difference in the behavior of Outlook desktop app compared to the web and Mac versions:
- Desktop – Must have Outlook open at the scheduled time for email to be sent. Will not send if closed.
- Web/Mac – Will send scheduled emails even if Outlook app is closed at delivery time.
So on desktop, make sure Outlook is running for scheduled emails to be sent. The web and Mac apps handle scheduled sends independently.
Track Opens and Replies
To see if recipients open and respond to scheduled emails, enable email tracking in your Outlook account settings.
This displays useful activity insights:
- Open tracking – See if email was opened by recipient
- Link clicks – Check if links in email were clicked
- Reply notifications – Get alerted when a reply is received
Schedule Follow-Up Reminders
You can also schedule follow-up reminder emails using Outlook’s feature.
For example, if emailing a prospect, schedule a follow-up in 2 weeks in case of no reply to the initial email.
This persistence and reminder increases the chance of eventually getting a response.
Best Practices for Scheduled Emails
Some best practices for success with scheduled emails include:
- Proofread content before scheduled send time.
- Space out scheduling for bulk emails to avoid spam filters.
- Use tracking insights to refine communication and messaging.
- Send reminders/follow-ups if no response after initial email.
- Adjust scheduling if low open rates on recurring newsletters.
With some diligent management of scheduled emails, you can ensure your communications always reach recipients and drive engagement.

Scheduling Emails in Outlook vs. Other Tools
While Outlook provides basic email scheduling, there are limitations compared to dedicated email marketing and automation platforms. Let’s compare Outlook to some other options.
Basic Email Scheduling vs. Email Marketing Tools
Outlook’s scheduling allows you to set a date/time for sending individual emails. Useful for occasional use cases.
But for regularly scheduled email campaigns, newsletters, and complex sequences, full-featured email marketing tools are more powerful.
For example, Mailchimp, Constant Contact, ConvertKit etc allow you to:
- Schedule recurring email series with complex logic
- Send to large audiences with segmentation and groups
- Integrate with your website, store, events etc
- Get detailed analytics on campaigns
- Optimize content and timing based on insights
So for serious email marketing needs, use dedicated platforms beyond basic Outlook scheduling.
Third-Party Scheduling Apps
There are also standalone email scheduling apps like Boomerang and Mixmax that integrate with Outlook.
These provide added functionality like:
- Scheduling emails to send whenever ideal like low unsubscribe days
- Email tracking and analytics overlays in Outlook
- Snooze incoming emails to reappear later
- See optimal send times based on past email analytics
The tradeoff is needing to grant access to read your emails. But they can enhance Outlook scheduling in targeted ways.
Evaluate whether Outlook’s built-in scheduling meets your needs or if integrating a sophisticated email marketing platform or third-party scheduling tool provides more value. Each approach has pros and cons to weigh.
Email Scheduling Best Practices
Now that you know how to schedule emails in Outlook, let’s go over some tips and best practices to use the capability effectively.
Schedule Emails for Optimal Send Times
First, be strategic with scheduling for when recipients are most likely to open and engage with emails:
- Morning schedules – Early morning between 8-10 AM is prime email time for most people starting their workday. Late night emails tend to be missed.
- Mid-day schedules – Around lunch hours between 12-2 PM is another peak email checking time to target.
- Afternoon schedules – Later afternoon between 3-5 PM catches people before they start wrapping up their day.
- Consistency – Keep your recurring newsletters, promotions etc consistently scheduled rather than varying times.
Space Out Scheduling of Bulk Emails
When scheduling a large volume of emails to go out around the same time, spread them out over a period of hours or days rather than all at once.
For example, schedule 20 emails each at 8 AM, 10 AM, 12 PM, 2 PM rather than all 100 at 8AM. This prevents spikes in volume that can trigger spam filters.
Always Proofread Before Scheduled Send Time
Be sure to open and proofread every scheduled email shortly before the set send time. This gives you a last chance to tweak anything or revert unsubscribe requests.
Many embarrassing email mistakes happen because content isn’t double checked right before sending.
Follow Up if No Reply After Initial Email
Leverage scheduled follow-up emails in Outlook if you don’t receive a reply from recipients after your first scheduled message.
Wait 2-3 days, then send a friendly follow-up as a second attempt to get a response. Persistence pays off.
You can schedule unlimited follow-up reminders using the same steps.
Review Performance Data and Optimize
Use email tracking insights to identify scheduled email best times and make data-driven decisions to optimize:
- When are scheduled email open rates highest? Schedule more for those times.
- Are click-through or reply rates low? Try better subject lines.
- Is traffic from newsletters dropping? Refresh your content.
Get strategic with scheduling for the best email results. With Outlook’s scheduling capability and some smarts, you can make your email communication much more effective.
Key Takeaways: Mastering Email Scheduling in Outlook
Scheduling your emails in Outlook is a game changer for ensuring your messages get maximum visibility. Let’s recap the key lessons:
- Use Outlook’s scheduling to optimize send times for when recipients are active. No more middle of the night emails missed!
- Tailor scheduled delivery to account for recipients in different timezones worldwide.
- Avoid spam filters and deliverability issues when sending mass emails by spacing out scheduled delivery.
- Set reminders, follow-ups and recurring newsletters using scheduled sends to save time and effort.
- Learn the quick steps to schedule on Outlook desktop, web and mobile apps. Desktop requires Outlook to be open for scheduled send.
- Strategically schedule follow-up emails if no response after initial outreach. Persistence pays off.
- Check open and click rates to see if scheduled emails are working. Refine content, timing and subject lines based on performance.
- Take a step back to evaluate if Outlook meets your scheduling needs or if a more advanced email marketing platform is required.
With these tips, best practices and how-to walkthroughs for Outlook scheduling under your belt, you can ensure your emails always reach inboxes and drive engagement.
Now put that email scheduling know-how into action for more powerful communications!
Here is a 500 word FAQ section covering common questions about scheduling emails in Outlook:
FAQs About Scheduling Emails in Outlook
Let’s wrap up with answers to some frequently asked questions about using Outlook’s email scheduling capability.
Q: What are the benefits of scheduling emails in Outlook?
Scheduling emails allows you to control exactly when your emails are sent in the future. Key benefits are timing emails when recipients are active, coordinating across timezones, spacing out mass emails, and setting reminders.
Q: Can I schedule emails on Outlook mobile apps?
Currently no – Outlook’s iOS and Android apps don’t have native scheduling capabilities. You can use the Outlook web app’s desktop site as a workaround.
Q: Do scheduled emails send if my computer is off?
It depends – For Outlook desktop, your computer needs to be on at the scheduled date/time for the email to send. But web and Mac send scheduled emails regardless of computer state.
Q: Can I edit or cancel a scheduled email?
Yes, scheduled emails can be edited or canceled anytime before the set send date/time. Open from your Outbox folder (desktop) or Drafts folder (web).
Q: Is there a limit to how far in advance I can schedule emails?
No, there is no limit within Outlook. You can schedule emails extremely far into the future if needed – weeks, months or even years.
Q: Can Outlook schedule recurring email campaigns?
No, Outlook can only schedule individual emails one at a time. For complex recurring email campaigns, use a dedicated email marketing platform.
Q: What happens if Outlook crashes before a scheduled send?
If Outlook on desktop crashes or closes before a scheduled email is sent, the email will not be sent at that time. The desktop app must be open.
Q: Can I tell if recipients opened scheduled emails?
Yes, enable tracking in your Outlook account settings. This will show if scheduled emails were opened and clicked, so you can refine messages.
Q: Should I schedule emails as I write them or all at once later?
Best practice is to batch schedule related emails together once you’ve written them all, for better organization. But you can also schedule individually.
Q: How do I avoid spam filters when scheduling in bulk?
Space out large volumes of scheduled emails over several hours or days. Sending hundreds all at once is seen as spam behavior.
Hopefully these common questions provide additional tips for mastering Outlook’s email scheduling capability! Let me know if you have any other questions.

